I’ve been feeling blue this week. Not depressed kinda blue, more
along the lines of little miss Bonnie BLUE Butler. So as I mentioned in my last
post, I’m using Petite Very Velvet. I’ve shied away from this thread in the
past other than in small areas because usually my stitching aesthetic is that I
really enjoy seeing specialty stitches and this thread is so plush, it almost
amasses itself into fabric once stitched, but luckily that’s the look I’m going
for! One thing I love about this thread is even if there are little errors, it
won’t even be noticeable so that’s a bonus.

At first I thought I’d stitch her coat using brick over two but
it’s looking way too stripe-y for my liking. We don’t want her looking like a
prisioner of the confederacy now do we? Here is a perfect example of knowing
when a stitch is NOT working.

What I do need is a stitch that lends itself to shading but is
relatively small and forgiving so I went with an old classic, Encroaching
Goblin... like most old movies, it’s a classic for a reason, it WORKS. The owner of B.F. Goodstitch, Fidelis, and I have had this conversation many a time....new, fancy (I think of them as
“sexy stitches”) are great and all that but it’s the ones that actually work
that you keep going back to again and again, and there’s no shame in that game.
I’m using V644 for the deepest saturation, V660 for the bright highlights and
V634 for the bulk of the blue. Sometimes I even write this on the card it comes
on and I find it really helps.
A word about interlocking/encroaching stitches, alot of my
students struggle with them. Many stitch diagrams tell you to come up at the
area where the interlocking sections touch, many new stitchers (or stitchers
new to special stitches) find this very difficult/awkward because they often
don’t have a clear hole where they’re coming up because it’s almost under the
previous stitch. I find it’s often easier to manipulate your stitch to come up
further away (usually in a clear hole) and then go down through the canvas in
the area near the interlock from the top of the canvas where you can see what
you’re doing and if you can’t, this allows you to slide your thread over a
little so you can see. Its fine to stitch a specialty stitch in a different
direction than charted but I caution you to be consistent within the same
series of stitches for a host of technical reasons I won’t bore you with.
So as you will see in the following photos, I went over the
collar and buttons. Don't be alarmed, I often do this for a couple of reasons. First if I’m
attaching anything, I will often stitch over that area, so if the attachment
ever falls off, at least there isn’t a naked spot (goodness me, how
scandalous!). Second, I’m doing something fabulous with that collar but I need
to be on top of those stitches, so I’m going to do my technique on top of the
stitching.
After a lot of delineation, I decided to do a loopy detached
buttonhole in a #8 Braid Kreinik number 100 10M. Why a Kreinik? The
simple answer, weight. I want this thread to have a little heft to it but not
be bulky, especially since it’s on top of velvet. I don’t want anything floppy
and too fine, but anything heavier than a #8 would be too much (at least on an
18 count canvas).
Never done detached buttonhole? Don’t be nervous, it’s pretty
easy actually and I think a big bang for your stitching time. You can stitch
your baseline in chain or backstitch. I went with backstitch since I want to
keep this relatively simple. You don’t want your baseline stitches super tight
but not too loose either, about the same as if you were planning on wrapping
them. You then come back up through the hole of the end of your baseline and
you make like you’re wrapping but you want to catch the stitch.... like this:
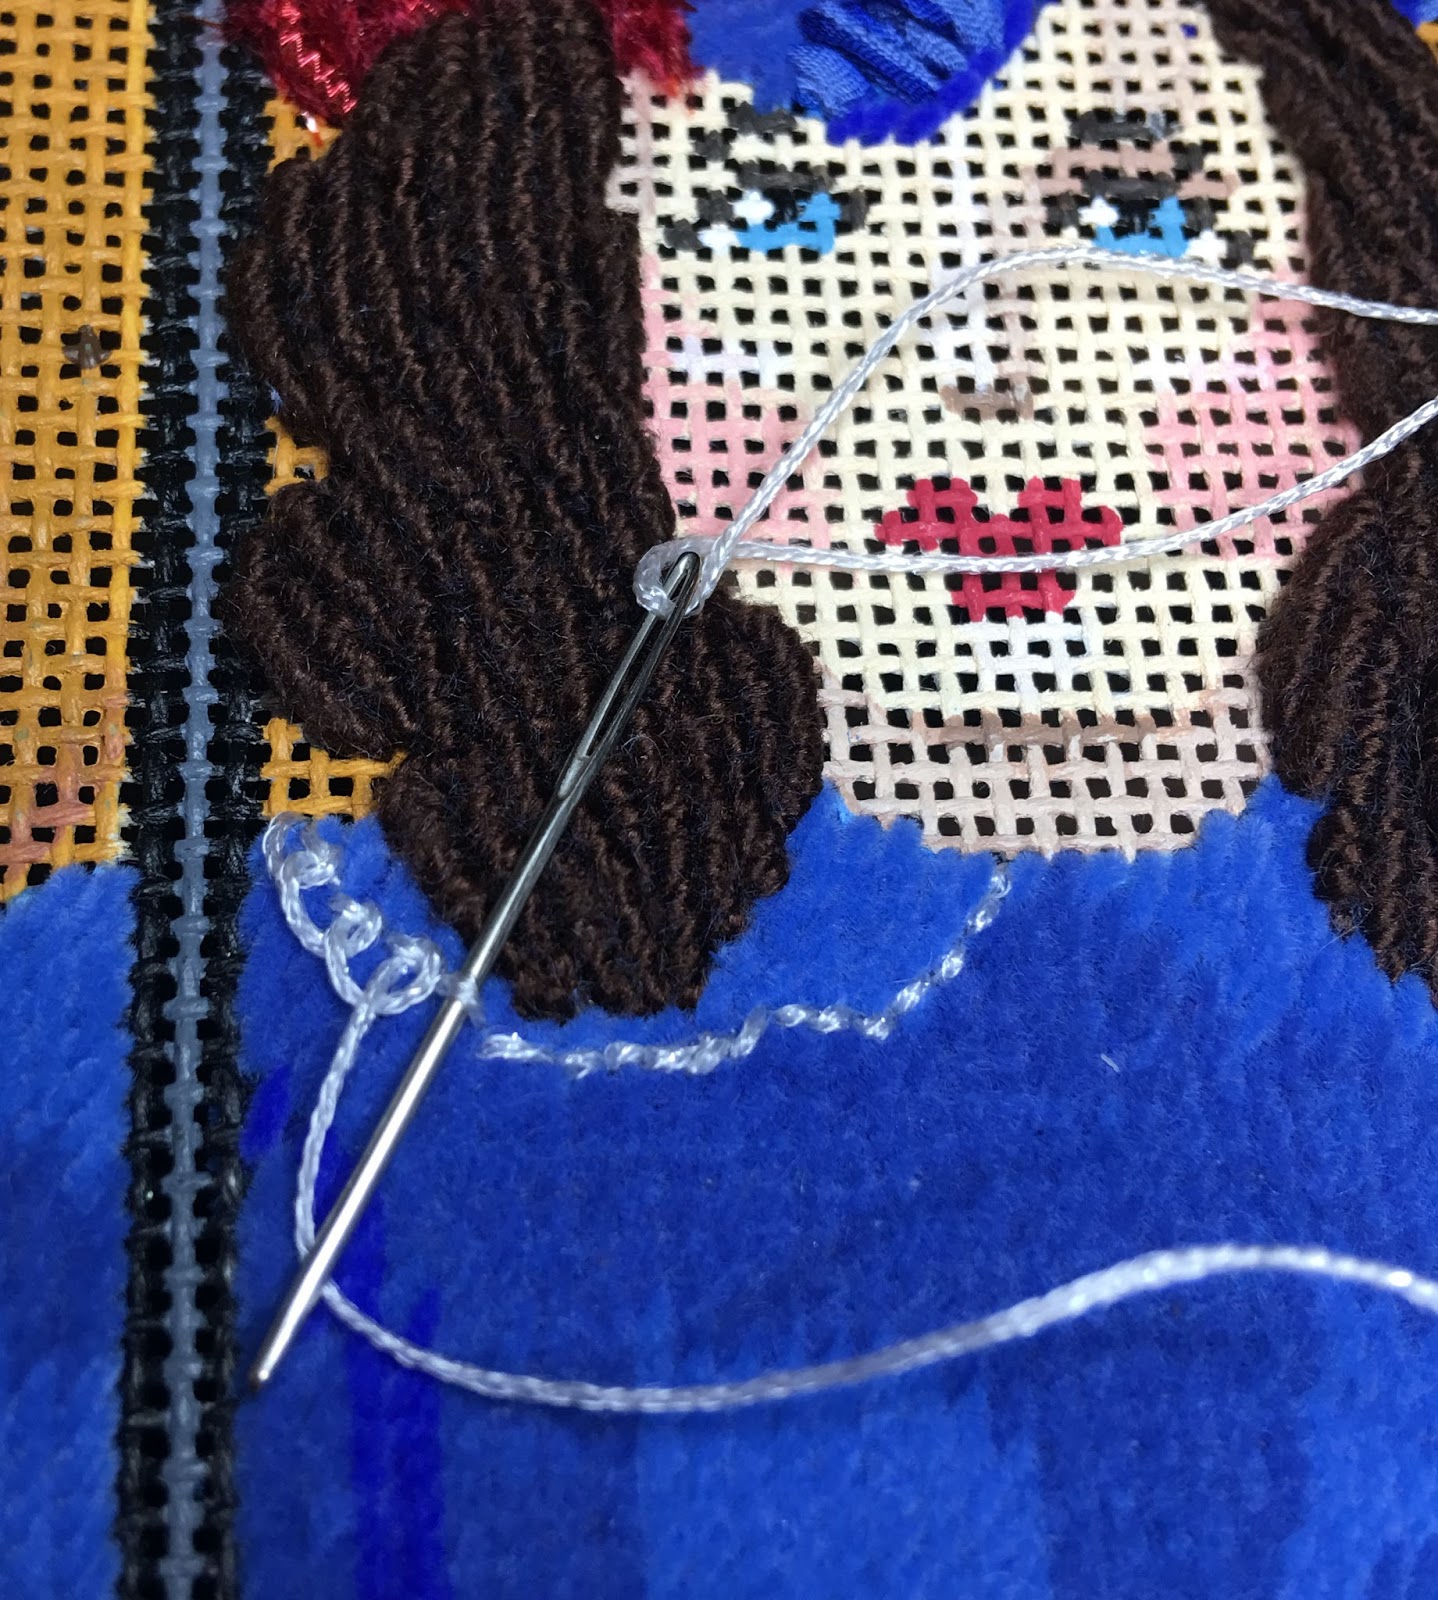

And you keep the “wrap” relatively loose and the nice thing with
a Kreinik is it almost naturally curls. So here’s a little secret about me, I
sometimes cheat, except I like to think of it as a helping hand.... I kept
pulling my loops too tight when I went to do my next stitch pulling the
previous stitch’s loop, so I strategically poked a stainless steel pin in each
stitch and then when I did the next stitch I moved it, so it like followed me
across the row. This is a great trick
if you’re having issues with tension and you can’t get your
loops about the same. Necessity is the mother of invention! You continue this
all the way across and you can go back to where you started and keep adding
rows by using what you last stitched as your new baseline if you like...I’m not
doing to do this because I really do want to keep it relatively simple. Make
sense? If not, I may not be not articulating well. If you’re a visual learner,
pop over the Mary Corbet’s YouTube HERE, as she has a great tutorial (these
are shown as embroidery but most of her videos can easily be applied to
Needlepoint). And here we are so far:

So I was going to show you the rest of what I’m going to do with
little Miss Butler but I think I’m going to save that for next time. And don’t
worry, I didn’t forget about her buttons. I have a couple of ideas I need time
to work out, all of which I can catch while I’m working other areas so I think
I’m going to try a few things and attach them towards the end where they won’t
vex my patience. Like Bonnie Blue who had been waiting for her father all
morning (before that fateful pony ride) I’m going to keep you wanting more, so
that’s my cue to stage left.... Until next time, we would be ever so appreciative
if you would please spread the word about our blog. Pass this along to your
stitching friends or those who love the movie as much as we do. If you haven’t
already, please consider signing yourself up to receive updates—new post
delivered right in your inbox—and don’t forget to verify your subscription by clicking on the link in the verification email!