Friday, December 8, 2017

Whipping it up!


As if Bonnie Butler’s story-line wasn’t tragic enough, Bonnie has been giving me a run for my money with this canvas. You remember the saga last time of figuring out what to about her buttons, well the drama continues! I had some moments of inspiration followed by challenges and then some wonderful victories, so the journey has been all over the place, similar to Rhett and Scarlet's marriage come to think of it.


The next component I wanted to tackle was her fabulous whip! I’m hearing that Devo song in my head. . . “Whip It, Whip It Good!”! Right off the bat, I knew I wanted to somehow pad it to give it some shape. You can use all kinds of things for padding, felt (popular in goldwork and stumpwork), Q-tips (both the ends and just the cardboard center portion are great for walking sticks, staffs and all manner of stick like items), and pipe cleaners are all popular choices, but none of these seemed quite right, and then one day inspiration struck. For my regular job, I work a traditional office job and one day I was in our coffee station getting a cup of Joe and it dawns is me, our black mini-straw-like coffee stirrers might be exactly the ticket, and I was green, I literally washed the one I used and brought it home. I cut it to length and tacked it in place at a few different points using black floss and then used Rainbow Gallery Patent Leather in black (PL1) and wrapped it and the canvas underneath to fully hide everything. At both the top and the bottom I had to go around the end first and then up over the top to smooth it out. I will admit that this thread was easier to use than I had expected, however, this being a flat thread and having a back and a front, you have to lay it on both the front and back of your canvas to keep the correct patent side on top so the thread is not twisted. A word to the wise about using this kind of material for padding. This straw is plastic. All along I have had every intention of framing it and given the techniques I'm doing that won't change but if you were planning on doing this technique or an ornament or or a stand up or a pillow, make sure you give your finisher a heads up so in case they iron it, the plastic doesn't melt. It hasn't happened to me, but better safe than sorry. 


Now that the handle is all wrapped, I couched one strand of Kreinik #12 braid 005 (black metallic) above for the straight line above the handle section (which I have since found out--thank you Google-- is call the fall) and back stitched the part you would hit the horse with (which is call the popper). Black Metallic is one of those thread I highly encourage you to keep on hand, even if you don’t have an immediate use for it. It’s great for all kinds of areas from pupils of eyes to wrought iron fences. I wanted some dimension too so off to the local craft store where I found this cool leather cording in the jewelry making section of Michael’s (if you don’t have or like to support big box stores, your local beading stores might have this as well). I only needed a little but I can think of alot of potential future uses so I don’t mind having the left over in my stash. I cut a few inches, widened the holes on either side of the whip, fed it through and then created an over-hand knot to make it really fly off the canvas and cut it to the desired length. The center of this leather is actually brown at the cut areas so here’s that OCD-ness again so I used a sharpie and just touched up the ends. So now I’m going to say to do as I say and not as I do. You might want to hold off on the leather cord until the end. I’ve been catching stitches on it. I’m fine with it because I wanted you to see the affect, but it might slow you down, so feel free to hold off on that last bit of leather cord.


Now what to do with the whip handle going through Bonnie’s hand which I determine  has a glove on it. I knew I wanted to use Neon Rays N22 because it’s the perfect color and with so much texture already going on with Bonnie’s ensemble, why not guild the Lilly and go with rayon thread! First I made 2-3 long verticals stitches for padding to the left of the stirrer/whip handle. I then wrapped the handle/stirred similar to how I covered the handle only one canvas row to the left and stitched in horizontal stitches all the way to the right following the painting of the canvas. I then basketweaved the remainder of the hand/glove.

From this point is where the plot thickens. (Cue the drama!) The next thing I did was use a slightly darker shade of two strands of Anchor Marlitt (which has been discontinued) to make long stitches to give the appearance of dividing lines of the fingers.  This was an epic fail.


When that didn’t work, I took those out and then stitched bullions with my Neon Rays. I have successfully used this for a Melissa Shirley small Santa. That time it worked because the scale of the hand was the same as the bullion. So bullions are not ALWAYS a bad choice, but when I tried it this time, the scale was too small, so that didn’t work. I also tried doing two bullions and wrapping the two together, Neon Rays being a rayon, it kept snagging while I tried to wrap them and quickly became a complete mess so that wasn’t working either. What a disaster! So now what??.....


At this point, it’s late and a school night and I’m tired, (and aggravated, don’t forget about that), so when in doubt, take a deep breath and take it out what you’re unhappy with and give it some more thought in the morning with a clearer head. So for my above mentioned “real” job I have a long commute of over an hour by train and then subway both too crowded for stitching, but built in time to stew—I mean strategize—about my next stitching move. I have long known that stump work often uses wrapped wire for the base of fingers and hands. I found a nifty video online demonstration how (which you can see HERE) but it was more involved than what I needed... but it provided great inspiration. What could I use that would be about the right scale, be easy to work with and easily accessible? Thus enters the humble wire TWIST TIE! Yes, as in the kind on your bread bag. Coffee stirrers? Twist ties? I’m sensing a kitchen theme afoot.

We all have that jar or drawer full of twist ties and elastics and such, I got lucky and had several red ones. If you only have white ones and they have an outer layer of paper (not plastic), you could use a sharpie to make them any color you need (if you do this, make sure you tell your finisher, sharpies have been known to bleed so word to the wise). My ties ended up being a tad too thick, so using tweezers and a pair of my not-best embroidery scissors, I trimmed them down to size by taking a little off both sides and cutting them to the desired length. Using a stiletto/laying tool to open up the holes in my canvas, I maneuvered my wires through the canvas and folded them over to the back. I let them sit slightly off the top of the stirrer so they had a little loft, threaded up my Neon Rays and came up one canvas thread in from the wire and proceeded to wrapped the twist tie laying my Neon Rays. Neon Rays is a flat thread so you want to make sure your thread lays flat as well as you wrap, you might need to manipulate the thread. Once I had it wrapped, I re-pierced the canvas and went to the back, buried my thread and then wrapped my twist tie ends down to my stitches on the back making sure it didn’t get too bulky back there and then trimmed the extra twist tie as necessary. And then I repeated these steps three more times (wait, you may think I’m missing a finger, ohh but I’m not because when you hold something, your hand is in a fist so your thumb is in the back, so we won’t see that - the devil really is in the details!)
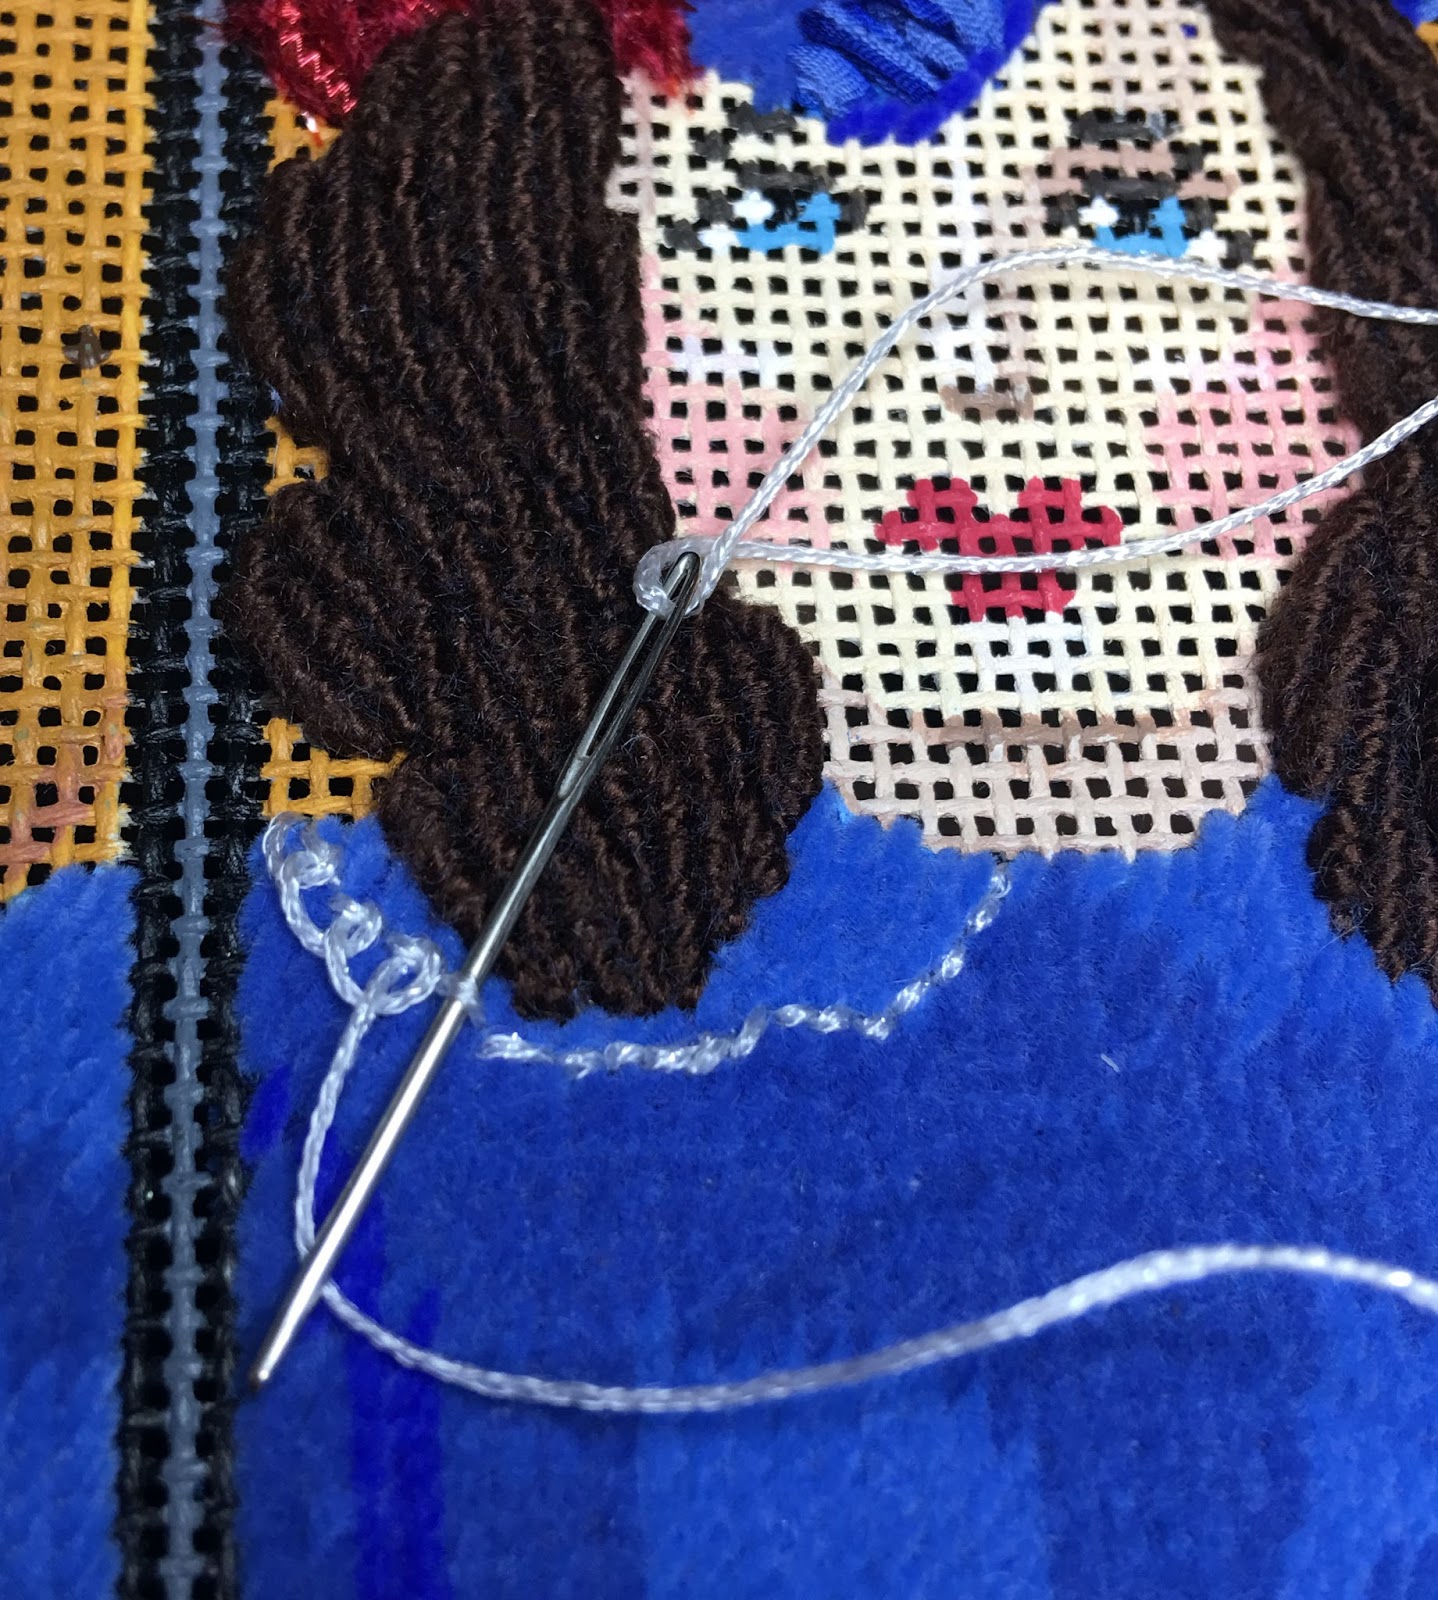


Now that I’ve gotten through all these challenges, I was happy to start basketweaving Bonnie’s face. The main skin tone was stitched with Pepper Pot’s Tippy Toes #194, the darker dividing lines was Pepper Pot’s Scallop #035, the shadows on the neck was stitched in Pepper Pot’s Baked Alaska #192 and there are a few highlight stitches down the bridge of her nose, above the blush on her left cheek and under the mouth in four strands of Splendor S1147. Her cheeks were stitched with four strands of Splendor’s S816 (third color down on Rainbow Gallery’s Santa’s Rosy Cheeks card) and her lips in Neon Rays N22. Her lips are a little bright but they are in my inspirational photo too, plus I think it helps tie in the gloves and feathers in her hat so I went with it. And below is our completed Bonnie.


It’s funny, I hadn’t imagined I could fit so much technique into little Bonnie, but I guess I did, how fun! So now what area should we tackle next? You’ll just to stay tuned and find out next time. If you haven’t subscribed to our blog, please do so and encourage your friends (and importantly, don’t forget to click on the activation link to finalize your subscription). If you run into any issues, feel free to leave a comment along with your email and I’ll get back to you.


Until next time, Fidelis and I wish everyone a magical holiday season!

Thursday, November 9, 2017

Bonnie Blue Buttons...I mean Butler!

Last we met I had stitched Bonnie’s jacket with Petite Very Velvet and left you with the promise that I had something cooking and I don’t mean no vittles. Ever have this happen? You get an idea in your head, it sounds easy enough. You gather the necessary materials are pumped up to go through with your hair-brained scheme and then PHOOM, you fall on your face! Well maybe not as dramatically as Scarlett entering a roomful of gentlemen, but you get the idea. It all started in this wonderful little shop that had adorable mother of pearl buttons for doll cloths, but they’re not the right color, but wait, I’m feeling creative, so assume I can cover them! With what? I’ll think of hat tomorrow.... well, turns out “tomorrow” is now today... so I covered the button with 13mm silk ribbon, the same color as in Bonnie’s hat, Victoria colored Pepper Pot silk ribbon. I was quite proud of myself actually it wasn’t so bad to do, but then I attach it to the canvas and as much as I want to, I can’t deny it, the scale was too big, at least I thought so (as did my closest & oldest stitching friend). They also had a high shank so they sat high off the canvas. So now I think “OK, I have crystals, I’ll just use those”. Yeah, right, they’re round and small, so as I work with them, they go flying across the room like Scarlett after one of her sister’s suitors. Plus no matter how hard I try, because they’re round, I can’t hide the mechanics of my stitches on the back, and it’s too bulky. Now I’m beyond aggravated because it’s been an entire evening of fruitless work!! But the crystals are a gorgeous matching dark blue, so I throw my hands up in despair and think they’ll just have to do. One would think the story ends there but clearly you don’t know me like you think you do, usually that is not my method of operation. So the next day after I’ve calmed down a bit and more (obsessive) thought, I decide the crystals aren’t right because it’s a riding jacket, again with the day wear rule (eye roll). So I remove the crystals and find smaller clear doll buttons. These ones are at least two millimeters smaller and don’t have a shank, so they’ll sit flush on the canvas.  

After my many failed attempts, let me tell you how I finally accomplished my task.. First you need teeny tiny doll buttons (mine were clear 5 MM buttons), a sharp needle, 13 MM or 17 MM silk ribbon (I used 13MM but you could also use a scrap of fabric but let’s not muddy things shall we) and matching thread (I used DMC floss). Cut an inch or two of ribbon and place your button right side down centered on the ribbon. With knotted thread, go through one hole of the bottom of the button, pierce the ribbon and then down through the ribbon again to go through the other hole of the button. You have to almost feel the buttonhole since you can’t see it. You are now at the bottom of the button. Now fold in the short edges of the ribbon and pierce one side of the ribbon and then the other as close to the button as you can (make sure you are not piercing the ribbon on the side of the button). Then making sure the button is relatively centered (I found this the trickiest part), twist the ribbon relatively tightly, but not so tight you mange the ribbon, twisting it up close to the bottom of the button. Then use the thread to pierce the two long lengths of twisted ribbon making 1-2 small holding stitches again as close to the button as practical. Now use the thread to wrap two times around the bottom of the button to hold the twist and put in a few stitches as close to the button as possible to securely hold everything together and close any gaps. Using sharp scissors, trim the access of ribbon as close to the stitches as possible. Important: Do not cut the thread—including the long one your needle is attached to—if you do, it’s going to unravel like a house of cards. If that happens, you HAVE to start all over again. I assure you, there will be no saving it, I’m talking from experience here....and this is how it looks after it’s been wrapped and trimmed (sorry about the photo quality).

With all the steps above you always want to pull your thread through gingerly while still keeping everything tight, any bulk is going to hold the button off the canvas. Also different brands of ribbon are different weights, and the weave/weft sometimes get pulled out of being square, even though you want it relatively tight, be kind to your ribbon so it doesn’t look like it’s been put through the ringer. 

You will now need to think about spacing your buttons. I find a good set of pins with faux peal tops is a great way to test and figure out spacing. In the photo below I was toying with the idea of a top button, I nixed that idea but it may come up again at the very end of the project, we shall see, but the point is the same, using pins is a convenient way to visualize what is going where and  save time or possible aggravation later.


Once you have your placement figured out, pierce the top of the canvas where the button to going to go, on the back of the canvas come up one canvas thread away and go through one hole of the button and back down the other (as if you were attaching a regular button) and repeat so you go through both holes twice. Now come back up to the top of the canvas under the button but not piercing the button or the ribbon and wrap underneath the button from the top 1-2 times and go back through the canvas. This will help any mechanics if you can see them. For extra security, I take a stitch through the stitching already on the back of the canvas and catch the loop like you would with hand sewing and I do this twice for good measure (or because I’m OCD — twice is always better than once in my book). These suckers are never coming off! And speaking of OCD, as you attach the other buttons keep in mind you probably want to attach them with the line between the two button holes consistently either horizontal or vertical, for a more polished look.


Now that I was able to bring my hairbrained idea to fruition, please don’t get me wrong, there were alot of failed attempt and more curse words than would be lady-like to admit, so if you try this yourself remember patience is a virtue. These will be a labor or love, but I’m sharing my saga—I mean story, — with you because I want to encourage you to try something different/new, even if you don’t know how it’s going to work out. If you can invasion it, there has to be a way to bring it to life on your canvas. Sometimes it’s that you don’t have the right materials or the right skills, but keep persevering. Go to other forms of needlework for inspiration, try different techniques, ask a stitching friend, eventually you will figure it out. I would be embarrassed to tell you how much time I spent plotting and practicing these buttons. I probably wasted an entire yard of ribbon, but in the end I’m happy with the results. To me it’s worth it because not only do I now have a new skill in my back pocket, but I also didn’t want to hate those crystals every time I looked at my canvas after it is all framed. If something doesn’t “feel right” to you, you will probably never be happy with it later. It is one thing to take some time to see if it grows on you, but before you go for finishing, if you still do not like it, take the time to change it, especially if it’s a piece you’re keeping for yourself! 

For such a little character, Bonnie sure has garnered a lot of attention — must have gotten it from her mother—but next time we’re going to get her finished up. Until then, please share this blog with your stitching friends. Wishing you and your loved ones a wonderful Thanksgiving and happy stitching! 

Thursday, October 5, 2017

Feeling blue. . .

I’ve been feeling blue this week. Not depressed kinda blue, more along the lines of little miss Bonnie BLUE Butler. So as I mentioned in my last post, I’m using Petite Very Velvet. I’ve shied away from this thread in the past other than in small areas because usually my stitching aesthetic is that I really enjoy seeing specialty stitches and this thread is so plush, it almost amasses itself into fabric once stitched, but luckily that’s the look I’m going for! One thing I love about this thread is even if there are little errors, it won’t even be noticeable so that’s a bonus.


At first I thought I’d stitch her coat using brick over two but it’s looking way too stripe-y for my liking. We don’t want her looking like a prisioner of the confederacy now do we? Here is a perfect example of knowing when a stitch is NOT working. 


What I do need is a stitch that lends itself to shading but is relatively small and forgiving so I went with an old classic, Encroaching Goblin... like most old movies, it’s a classic for a reason, it WORKS. The owner of B.F. Goodstitch, Fidelis, and I have had this conversation many a time....new, fancy (I think of them as “sexy stitches”) are great and all that but it’s the ones that actually work that you keep going back to again and again, and there’s no shame in that game. I’m using V644 for the deepest saturation, V660 for the bright highlights and V634 for the bulk of the blue. Sometimes I even write this on the card it comes on and I find it really helps. 

A word about interlocking/encroaching stitches, alot of my students struggle with them. Many stitch diagrams tell you to come up at the area where the interlocking sections touch, many new stitchers (or stitchers new to special stitches) find this very difficult/awkward because they often don’t have a clear hole where they’re coming up because it’s almost under the previous stitch. I find it’s often easier to manipulate your stitch to come up further away (usually in a clear hole) and then go down through the canvas in the area near the interlock from the top of the canvas where you can see what you’re doing and if you can’t, this allows you to slide your thread over a little so you can see. Its fine to stitch a specialty stitch in a different direction than charted but I caution you to be consistent within the same series of stitches for a host of technical reasons I won’t bore you with.

So as you will see in the following photos, I went over the collar and buttons. Don't be alarmed, I often do this for a couple of reasons. First if I’m attaching anything, I will often stitch over that area, so if the attachment ever falls off, at least there isn’t a naked spot (goodness me, how scandalous!). Second, I’m doing something fabulous with that collar but I need to be on top of those stitches, so I’m going to do my technique on top of the stitching.

After a lot of delineation, I decided to do a loopy detached buttonhole in a #8 Braid Kreinik number 100 10M.  Why a Kreinik? The simple answer, weight. I want this thread to have a little heft to it but not be bulky, especially since it’s on top of velvet. I don’t want anything floppy and too fine, but anything heavier than a #8 would be too much (at least on an 18 count canvas). 

Never done detached buttonhole? Don’t be nervous, it’s pretty easy actually and I think a big bang for your stitching time. You can stitch your baseline in chain or backstitch. I went with backstitch since I want to keep this relatively simple. You don’t want your baseline stitches super tight but not too loose either, about the same as if you were planning on wrapping them. You then come back up through the hole of the end of your baseline and you make like you’re wrapping but you want to catch the stitch.... like this:


And you keep the “wrap” relatively loose and the nice thing with a Kreinik is it almost naturally curls. So here’s a little secret about me, I sometimes cheat, except I like to think of it as a helping hand.... I kept pulling my loops too tight when I went to do my next stitch pulling the previous stitch’s loop, so I strategically poked a stainless steel pin in each stitch and then when I did the next stitch I moved it, so it like followed me across the row. This is a great trick
if you’re having issues with tension and you can’t get your loops about the same. Necessity is the mother of invention! You continue this all the way across and you can go back to where you started and keep adding rows by using what you last stitched as your new baseline if you like...I’m not doing to do this because I really do want to keep it relatively simple. Make sense? If not, I may not be not articulating well. If you’re a visual learner, pop over the Mary Corbet’s YouTube HERE, as she has a great tutorial (these are shown as embroidery but most of her videos can easily be applied to Needlepoint). And here we are so far:


So I was going to show you the rest of what I’m going to do with little Miss Butler but I think I’m going to save that for next time. And don’t worry, I didn’t forget about her buttons. I have a couple of ideas I need time to work out, all of which I can catch while I’m working other areas so I think I’m going to try a few things and attach them towards the end where they won’t vex my patience. Like Bonnie Blue who had been waiting for her father all morning (before that fateful pony ride) I’m going to keep you wanting more, so that’s my cue to stage left.... Until next time, we would be ever so appreciative if you would please spread the word about our blog. Pass this along to your stitching friends or those who love the movie as much as we do. If you haven’t already, please consider signing yourself up to receive updates—new post delivered right in your inbox—and don’t forget to verify your subscription by clicking on the link in the verification email!

Thursday, August 24, 2017

Feather in my cap!

Today I'm focusing on Bonnie's beautiful chapeau. The movie costume was made of velvet (which I never understood, I mean they're in Georgia) so that's what I'm using, Petite Very Velvet from Rainbow Gallery in numbers V664, V634  and V660 which are the perfect hues for this very famous outfit. I usually use Very Velvet very sparingly as it often appears heavy but for this piece I am probably going to use it in two large areas which will be a first for me, but the subject matters call for it and thankfully the areas are in opposite corners so they will balance out the heaviness within the piece. 


Today I'm going to concentrate on her hat. I find it helps to start with an inspirational photo and I used this one below.


I started with basketweaving the deepest blue (V664) which is the shadow on the bottom and then backstitched to outline the edge. I have been dying to use some ribbon lately and this gorgeous Planet Earth Silk Ribbon fit the bill perfectly. It is 7mm and the color is called Victoria (I would have named it Bonnie but what do I know?!). For me Ribbon often involves a bit of futzing (yes that's a technical term) and I tried to balance laying the angled satin stitches and getting some pretty pleats. This color is an overdyed so that really helps create depth. Using the medium blue, V634, I then stitched diagonal mosaic in the left hand blue portion of the hat.

Now how to tackle those feathers? I knew I wanted to use this beautiful Access Commodities Wire Check Purl #5 in Melon, MET 1607. I'm going to warn you, it's a "slippery little varmint" as Bonnie's mother would probably call it. If you don't have the patience to deal with purl, I would suggest memory wire as a suitable substitute, but like Ms. Scarlett, I'm always up for a challenge so oh yeah, I went there! 


I thought of curse words I haven't thought of in years because you have to treat this product delicately, with kid gloves. You can slightly stretch it to make it less springy or even purposely over stretch it (and twist another thread into it) if that's the look you want but once you do so there's no going back. You can use a matching thread that you have run through beeswax to couch it but I used The Collection Designs' clear beading thread because it's one of my favorite products. Once you have this invisible/clear beading thread in your stash you will find tons of uses for it and at a generous 100 yards per spool, it lasts a very long time-- I'll be using this again on this piece, I'm sure. So I cut the purl to length in mini-sections and went through and applied it like a very long bead and then strategically couched it down to manipulate it into place dividing the feathers into sections. If you have a very long piece you want to attach, you could always try using those bullion needles we talked about last time. "WARNING WILL ROBINSON," watch your couching tension, one swift, too-forceful tug and you'll crimp/deny the wire and ruin the purl beyond repair. Just take me on my word on this... Full confession: a decent amount of purl ended up in the trash... I don't anticipate using purl again on this piece but I do intend to practice using this product-/like Bonnie practiced her pony jumps-let's hope I have less tragic of an outcome.  Here is a photo of the purl, before I started with the Fuzzy Stuff.


After that, I went back and did long directional stitches, random long and short, using Rainbow Gallery's Fuzzy Stuff FZ13. You may notice there are two colors painted in the feathers. I decided to use the painted lighter color to help me with placement location of the purl but I only used one color Fuzzy Stuff because between the fuzz which also includes a little shine/sparkle and the metal purl, there is a lot going on already, no need to further gild the lily. Using a clean tiny comb (brand new, I save this one just for needlepoint) which was originally designed to separate lashes after you apply mascara, I did a little fluff job. I normally use a wire nap brush for fluffing turkey work and the like, but did I mention the purl is as delicate as dew on a magnolia?? I think I did, so I dared not catch it on the purl so I went with something I can better control. Sometimes restraint is most efficient in the long run. And below is the result.


Next time I'll be working on Bonnie's outfit. My mind is racing with ideas for that lace....and what to do for those teeny, tiny buttons??? Until next time, I'm gone with the wind.


Saturday, July 8, 2017

Don't get bull about bullions. . .

Bonnie Blue Butler, it's a very strong sounding name for a fragile little girl. The original "daddy's girl". It's difficult to think of her without associating her with her character's tragic end, but we'll think about that tomorrow. Beyond her being the apple of her father's eye, she was also her mother's daughter in that she was simply beautiful, again with the gorgeous skin and hair, those amazing ringlets! So knowing what we have in mind for Aunt Pittypat's ringlets (I say "we" but as you may remember from my first post, it's GOING to be Fidelis who does that!), how do I stitch Bonnie's hair to give it justice? After much debate I kept having the same thought.... Oh, no, it can't be.... It can't be.... Fiddle-dee-dee, there must be another option???  Dare I say it? Bullions!!! Oh bully!

Bullions can send shivers of fear down the spine or even the most serious and advanced stitcher, but not too long ago I decided to get over it and try and tackle this sometimes elusive stitch. First of all, the most useful materials I've found about bullions is Mary Corbet's video on Needle N Thread. Yes, I realize this is an embroidery site, but the stitch is the same and I have learnt so many technique from Mary. If you haven't spent significant time on this site, I highly recommend you do. I am also a big believer of tools... In general I love stitching accoutrements and going to the trouble of getting bullions needles really is worth it in my opinion. For one thing the eye of the needle is the same width as the rest of the needle making it easier to pull your wraps through, for another the extra length or the needle helps with longer bullions so your wraps don't keep falling off. I suggest getting a package with assorted sizes so you can experiment and find what's best for the situation at hand. I used the 3 1/2 size and I will admit they were a bit too big, I probably would have been fine with the next size down, but this worked fine. I used the ones put out by Colonial Needle and if you go to their website they also have instructional videos which is a nice bonus. 


Some other things to think about, don't wrap the needle too tight (or too loose....it's kinda like Goldylock's bed) and after the last wrap, I give the wraps on my needle a quarter twist in the opposite direction of the  direction I wrapped, hold the wraps firmly but don't squeeze and pull your needle through. I personally do the little quarter twist because I tend to me a tight wrapper and I find it just helps. And most importantly, do NOT be afraid. Even if your bullion looks really messed up as your pulling, just keep holding and pulling, I have saved some really dire bullion knots and had them come out just fine in the end... sometimes you have to finagle a bit by putting the needle under the knot and running it back and forth sometimes even with a little tension and then re-pulling it to help smooth it out. Bullions are used a lot for natural things like hair, flowers, fur and quills, none of these things are perfect in nature so don't over analyze your bullions, they're not "imperfect" they're "realistic". 

For Bonnie's hair I used Vineyard C-042 Dark Earth and really packed them in. I even had to do some bullions almost on top of others, but I wanted a certain look. I followed my "hair rules" that I wrote about in my previous blog previous post by breaking it up with a few directional knots and then filling in.


In our next episode we're going to focus on the mark of any proper Southern young lady (besides her manners that is), her attire, so if you haven't subscribed, please consider doing so and you'll get our next edition in your inbox!

Monday, June 5, 2017

When tomorrow is NOT another day!


There are times when projects just get away from you. You have the best of intentions, but then another project or deadline comes up (for instance, Christmas finishing deadlines are approaching – consider this your un-official reminder – some LNSs and finishers have deadlines now of 9/1 but I’ve heard 7/31 so inquire if you’re unsure) or you just need to have a mental break and stitch on something “brainless” for awhile but then you look up and miraculously a month or [gasp] TWO has somehow gone by. . . it’s like time is just “gone with the wind” (sorry, I couldn’t resist) and you haven’t stitched a single stitch on that other project. I don’t often procrastinate but when I do, I hear Miss Scarlet’s “Tomorrow is Another Day” quote in my head . . . but what do you do when that tomorrow just doesn’t come?! My boss at my 9-5 job often says “tomorrow is the busiest day of the year” and he’s absolutely right about that but unfortunately there’s not much you can do, you can’t go back and recreate yesterday. All you can do is cut yourself some slack, put the project back on your needlepoint stand and get back on track. One thing I often do when I get stuck or stalled – they are often related I have found – is pull some fun threads/beads/ribbons/crystals and start determining a stitch for the next few areas I’m going to tackle. Doing so is often enough to rekindle my excitement. . you know like how Miss Scarlet somehow has a new found interest in Rhett when he brings her a new bonnet back from Paris. . .  kind of like that, but not QUITE.

Unfortunately while I’ve been sidetracked, you all have been waiting with breath that is bated to hear about the results from the giveaway from my last post! I’ve already kept you “waiting on me” (as a northern, I love that southern phrase) for far too long . . . so with no further ado, the winner of the magnet and needle case is JUDY FORD . . Judy, please reach out to me at annecarrsalem@yahoo.com with your snail mail address and I’ll pop it in the post. Enjoy!


So in my next post I’m going to be talking about Scarlet’s “mini-me”, Bonnie Blue Butler. . . I promise to have tips and tricks in my next episode. If you don't currently subscribe, please consider doing so to get updates delivered right to your email inbox. In the meantime, I’ll need to stop “thinking about it tomorrow” and get to stitching because “tomorrow is another day”.

Wednesday, March 22, 2017

"Oh Ashley, I love you, I love you, I do"


Everyone remembers "that beautiful love scene" as Rhett refers to it a few moments later (after a vase is hurdled over his head I might add) that profession of love between Scarlett and Ashley that repeats in periodic scenes throughout the movie. It's the first scene where we get a glimpses of what Ashley Wilkes is really made of. Excuse me if I'm underwhelmed. I've devoured the book and I've seen the movie hundreds of times but I still can't wrap my head around what Scarlett's infatuation is all about, why didn't he just cut her loose right then??... but we wouldn't have such a great story I suppose... but that being said, it will be interesting to see how my personal lack of enamor for the "elegant Mr. Wilkes" plays into my stitch selections. 

He certainly can't stand out like Scarlet does. It's during antebellum after all, we have to let the ladies steal the show! It wouldn't be gentlemanly otherwise. Luckily though this character is pale and always seemed to fade into the background so I'm going to respect that and keep him true to character by stitching him in a rather quiet way to balance out the ladies. 

I used a much paler shade for the bulk of Ashley's skin; Vineyard Conch C-136 using  Splendor S896 and S1147 to highlight and define his skin and S1149 for his cheek color. Speaking of skin colors, if you haven't acquired the Splendor skin cards, I would highly recommend seeking them out. There is Blush which is what I pulled from on this and Bronze color ways (which we will see later). They are a must-have in my opinion for anyone stitching people regularly. It is so convenient for shading to have so many flesh-tones on one card and the colors on each coordinate so well together so it takes a lot of the guess work out of choosing shades.

His lips were stitched with four strands of Splendor S1041. I tent stitched them and then wrapped them but I wasn't satisfied with how they turned out so I wrapped them again in the opposite direction.

His hair is stitched a similar way as we stitched Scarlett (you can read about that HERE) using Vineyard Snapdragon C-049. 

Ashley's shirt is stitched in white Splendor S802 doing a Cashmere stitch to follow the shape. The collar is stitched in a skip tent using the same white Splendor. The shirt stripes are stitched in S947 and I first stitched one long stitch down the entire stripe coming up in the bottom left and going through the canvas at the top right of the stripe and then basketweave over that long stitch, this gives the stripe a subtle lift. The vest is stitched with three stands of DMC Floche 800 in Diagonal Mosaic and Reverse Diagonal Mosaic and I used Steel Grey High Luster Kreinik 010HL using French knots for the vest buttons. The tie is stitched using Neon Rays N01 in brick stitch over two. There again, I played with stitch direction to add dimension and the knot area of the tie is vertical brick and the two sides were done in horizontal brick. 

Now this brings me to a decision, what to do about the areas where one element goes into another shown in the areas circled below.


On the left Scarlett's hair bow will be in front, as will Melanie's veil on the right. I will be doing the hair bows in silk ribbons when I am almost done the entire piece and the veil will be something fabulous but I don't want to reveal my plans just yet, but I want it to be on top of Ashley's suit jacket so I'm going to stitch the suit jacket right on top of both areas covering them up and keep a photo to reference so I know what goes where later on. First, I back stitched the outlines of his lapels and wrapped the back stitching using the Neon Rays N01 and then the bulk of Ashley's suit jacket was stitched using Splendor S889 in Byzantine #2 (from the book Stitches for Effects) stitch on the left and then I reversed the direction on the right-hand side. Playing with direction is a very easy way to add some dimension and interest without making the piece too busy and it is an interesting way to visually break up areas that are the same color or stitched in the same thread. 

So going back to the beginning of my post about Mr. Wilkes, when I think of him, I usually associate him with books, maybe it's because that first love scene with Scarlett seemed to be in a library. My second favorite book happens to be Gone with the Wind and although I read it digitally, I have a much loved edition that just so happens to look like my magnet I mentioned in a previous post. And what is that saying about what you love you have to give away?? Well, in the spirit of that saying, I have a magnet and a matching needle case that I'm going to give away as a set. How do you win them? Please comment below on who your favorite Gone with the Wind character is and why, please also include your email address. Contest closes at 4 PM on April 7th. On April 8th, everyone's name will go in a bowl and one of our needlepoint students at B.F. Goodstitch will draw the name of the winner (it could be you!). The winner will be contacted by email. Duplicate comments will only be entered once.

See, you never know what's going to happen around here so please consider subscribing so you don't miss any of the fun!

Wednesday, January 11, 2017

The dress

The dress worth fighting over.....In Gone with the Wind, Scarlett's younger sister, Careen, whines to her mother that she wants to wear Scarlett's green dress to the barbecue. She's turned down, of course, but in actuality, the dress is white with a green lily of the valley flower type print with gorgeous ruffles across the bodice and shoulders. Which lead me to my dilemma, the movie costume is one thing but the way my canvas has been designed is very different. When in doubt, I go with how the canvas is painted and channel the spirit of the dress as opposed to killing myself by trying to be too literal.

So how to do it justice? With such beautiful shading, I hate to cover it up since that's one of the things I value the most in a hand painted canvas and the inspirational dress in the movie seems like a sheer overlay with a white lining, I think light stitching will be just the thing. I decided to go with a classic but easy to follow pattern of over three, under one, over three darning pattern on the vertical using two strands of silk Splendor. I'm using S1055 for the palest barely green shade, S905 for the medium-light green, S996 medium-dark green and S907 dark green. Before I get into the darning pattern, I'm going to deal with the dark green swirls, trust me, it will save my sanity.

In general I like to stitch strategically and I've stitched myself into enough corners to know it's easier to think about stitching order towards the beginning than to have to deal with headaches later. I have decided to do a wrapped backstitch over the dark green swirls using three strands of S907. By doing the backstitch and wrapping first, I can slip my needle underneath he wrapping while doing my darning pattern if necessary to keep my pattern going but also it is easier to do the wrapping portion without surrounding stitching so you won't have to avoid catching the darning stitches while trying to wrap. I don't want the wrapping to be too tight so I did my back stitches over two canvas threads at a time making sure the stitches and watching my tension. The important thing with wrapped back stitch is to always wrap in the same direction per swirl. So either outside of the line towards the inside or inside going towards the outside of the line, it doesn't matter which as long as you always keep your needle wrapping in the same direction thus avoiding making a tangled mess. Wrapped back stitch is also great for rounded lines.


 So now that the swirls are out of the way, a few things about darning patterns. Most darning patterns start on one end and continue to the opposite side. Since the stitching is so light, you can't start/stop a thread in the middle of a row. You also can't bury your thread to start it because you will see these mechanics through your light stitches. I will often use a L or pin stitch to start and stop my threads which essentially is taking a stitch vertical and then horizontal and I often go over them a few times just for good measure. Your thread should not be knotted so the L/pin stitches lay flat and your framer will just put the mat right on top of these stitches in the margin or they will be pulled to the back area of the framing as part of the lacing with no issues. If you are finishing as a stand up or ornament, your finisher will also know what to do (probably a row of machine stitching to prevent fraying of the canvas and these stitches will get caught and held safely). Since this pattern has so much going on, these things are not as much concern, so when I did my wrapped back stitch I did a few little jumps. And now I'm going to take a leap of faith and do something almost as shocking as a woman in mourning dancing the Virginia Reel, I'm going to show you my backside!


As you see, I followed under my back stitches on the backside to avoid as much traveling as possible and I jumped to the closest swirl. If it was too far away, I used a waste away knot and then buried under my back stitches later. Between the darning stitches the back stitches and dealing with the dots, you won't even see it. 

With all these color changes this is also a good time to mention thread management. The concept is to pull threads you are going to use again out of your way so you don't catch them while stitching other areas or colors. I use a combination of pulling them off to the side and wrapping them around the tacks of my frame on the front and keeping them on the needle and using a handy magnet... and speaking of magnets I can't believe I haven't shown the one I have been using.... there really is a magnet to go with every project if you look hard enough and I just couldn't resist this one:


So back to our darning pattern. Here is a quick illustration of the darning pattern I used. 

So now what to do with those dots? I know this is a day dress but I couldn't help but think sequins. It is still pre-war after all so a little glamour is not unheard of but still keeping in mind this is a day dress, I decided to meet in the middle and go with matte sequins. They weren't easy to find but I did and BF can help you find them too if you give them a call. I used a super thin invisible quilting thread to attach them.

And this whole plan is being repeated on the bodice except the ruffles which I have BIG plans for... but alas, we are back to where we started regarding stitching order. I plan on doing some major 3D ribbon work for the ruffles and we all know if I stitched that now it would catch on all my other stitching and probably get worn out and wrecked so I'm going to hold off and do that towards the end. But stay tuned because we are going to give you all the ins and out when we tackle them.

And here we are with the progress on the dress so far along. 

And "I'm ready for my closeup Mr. DeMille". . . oops, WRONG movie!

So that means ladies and gents that next time we are (finally) moving on to another character.... who will it be I wonder? Will it be the scoundrel bootlegger? Or the always lovely and appropriate Melanie? Don't miss a single episode, subscribe to our blog via the box in the upper right hand side for delivery right to your inbox. 

In the meantime, Fidelis and I wish you a healthy new year full of enjoyable stitching.